Παραγωγή Ήχου
ΠΕΡΙΓΡΑΦΗ
Θεωρία / Εκπαιδευτικοί Στόχοι
– Γλώσσα προγραμματισμού: σταθερές, συναρτήσεις
– Συνάρτηση map. Σύνταξη: map(ψηφιακό σήμα αισθητήρα, ελάχιστη τιμή εισόδου, μέγιστη τιμή εισόδου, ελάχιστη τιμή εξόδου, μέγιστη τιμή εξόδου).
Αντιστοιχεί ένα σήμα που κυμαίνεται στην κλίμακα {ελάχιστη τιμή εισόδου — μέγιστη τιμή εισόδου}, σε μιαν άλλη κλίμακα.
Υλικά
1 ηχείο 4 – 8 Ω ή βομβητής
φωταντίσταση
αντίσταση 4.7KΩ
αντίσταση 100 Ω
Κώδικας
Αρχικά θα χρησιμοποιήσουμε το έτοιμο παράδειγμα του Arduino IDE:
[Examples > 2. Digital > toneMelody ]
Συνδέουμε το θετικό του μεγαφώνου στο digital pin 8 και το αρνητικό στην γείωση.
/*
Melody
Plays a melody
circuit:
* 8-ohm speaker on digital pin 8
created 21 Jan 2010
modified 30 Aug 2011
by Tom Igoe
This example code is in the public domain.
http://www.arduino.cc/en/Tutorial/Tone
*/
#include “pitches.h”
// notes in the melody:
int melody[] = {
NOTE_C4, NOTE_G3, NOTE_G3, NOTE_A3, NOTE_G3, 0, NOTE_B3, NOTE_C4
};
// note durations: 4 = quarter note, 8 = eighth note, etc.:
int noteDurations[] = {
4, 8, 8, 4, 4, 4, 4, 4
};
void setup() {
// iterate over the notes of the melody:
for (int thisNote = 0; thisNote < 8; thisNote++) {
// to calculate the note duration, take one second
// divided by the note type.
//e.g. quarter note = 1000 / 4, eighth note = 1000/8, etc.
int noteDuration = 1000 / noteDurations[thisNote];
tone(8, melody[thisNote], noteDuration);
// to distinguish the notes, set a minimum time between them.
// the note’s duration + 30% seems to work well:
int pauseBetweenNotes = noteDuration * 1.30;
delay(pauseBetweenNotes);
// stop the tone playing:
noTone(8);
}
}
void loop() {
// no need to repeat the melody.
}
Άλλες εφαρμογές
Α) Ήχος μεταβαλλόμενης συχνότητας ελεγχόμενος από φωταντίσταση
Pitch follower using the tone() function
ΠΗΓΗ: https://www.arduino.cc/en/Tutorial/TonePitchFollower?from=Tutorial.Tone2
This example shows how to use the tone() command to generate a pitch that follows the values of an analog input
Υλικά
1. Ηχείο 4 – 8 Ω ή βομβητής
2. φωταντίσταση
3. αντίσταση 4.7KΩ
4. αντίσταση 100 Ω
5. breadboard
6. Καλώδια
Κύκλωμα
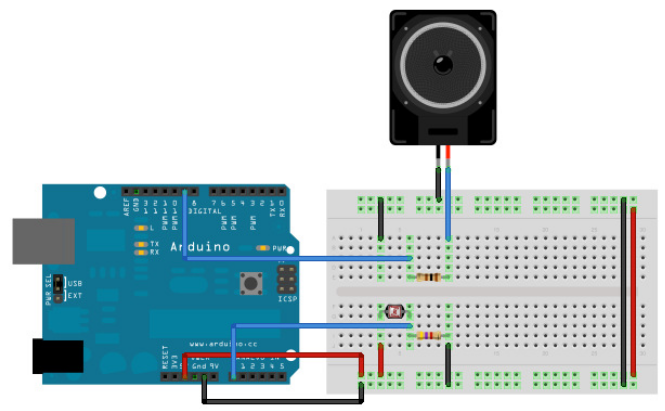
Εικόνα 6-12α: To κύκλωμα της άσκησης φτιαγμένο στο Fritzing
Connect one terminal of your speaker to digital pin 9 through a 100 ohm resistor, and its other terminal to ground.
Power your photoresistor with 5V, and connect it to analog 0 with the addition of a 4.7K resistor to ground.
Θεωρητικό κύκλωμα
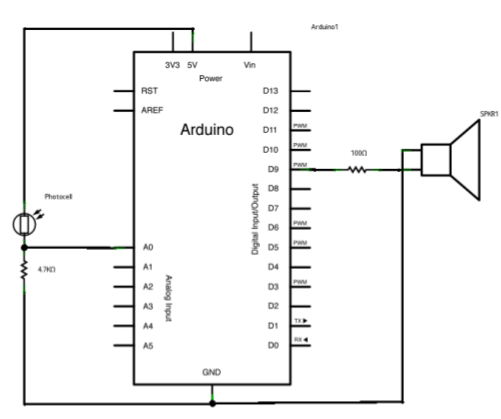
Εικόνα 6-12β: Το θεωρητικό κύκλωμα
Κώδικας
The code for this example is very simple. Just take an analog input and map its values to a range of audible pitches.
Humans can hear from 20 – 20,000Hz, but 100 – 1000 usually works pretty well for this sketch.
You’ll need to get the actual range of your analog input for the mapping. In the circuit shown, the analog input value ranged from about 400 to about 1000. Change the values in the map() comand to match the range for your sensor.
The sketch is as follows:
/*
Pitch follower
Plays a pitch that changes based on a changing analog input
circuit:
* 8-ohm speaker on digital pin 8
* photoresistor on analog pin 0 to 5V
* 4.7K resistor on analog pin 0 to ground
created 21 Jan 2010
Modified 4 Sep 2010
by Tom Igoe
This example code is in the public domain.
http://arduino.cc/en/Tutorial/Tone2
*/
// initialize serial communications (for debugging only):
Serial.begin(9600);
}
void loop() {
// read the sensor:
int sensorReading = analogRead(A0);
// print the sensor reading so you know its range
Serial.println(sensorReading);
// map the pitch to the range of the analog input.
// change the minimum and maximum input numbers below
// depending on the range your sensor’s giving:
int thisPitch = map(sensorReading, 400, 1000, 100, 1000);
// play the pitch:
tone(9, thisPitch, 10);
}
Β) tonemultiple
Δοκιμάστε τον κώδικα tonemultiple με 3 μεγαφωνάκια.
9.5/ Ασκήσεις για το σπίτι
CODE #2
int i=0;
void setup() {
pinMode(8, OUTPUT);
pinMode(6, INPUT);
pinMode(7, INPUT);
}
int wave(int s){
digitalWrite(8, HIGH);
delayMicroseconds(s);
digitalWrite(8, LOW);
delayMicroseconds(s);
}
void loop() {
if(i>10000){
i=0;
}
if(i<0){
i=10000;
}
wave(i);
if(digitalRead(6) == HIGH){
i+=25;
}
if(digitalRead(7) == HIGH){
i-=25;
}
}
CODE: Freq_gen.txt.
Τι κάνει αυτός ο κώδικας ;